A simple POS for a tailor shop counter: how Simple mode works
Updated · By the TailorSync team, built by a UAE tailoring family
Simple mode is a shorter version of TailorSync for the people at the counter: a Counter home screen with three big buttons, stitching orders taken one question at a time, an orders board with one button per order, and a Today page for pickups, fittings and closing the day. Staff who can use the till switch to it from the top bar, on every plan, and each device keeps its own mode. This guide walks through every Simple screen with screenshots from the app, so you can decide whether your counter staff can run the day on it.
Who Simple mode is for
Software that runs stock, purchases, VAT and reports has a lot of menus, and most of them aren't for the person at the counter. The tailor taking a kandura order needs to find the customer, write down what they want, measure them, promise a date and take an advance. Simple mode keeps those jobs and hides the rest. The menu shrinks to five items: Counter, Orders, Customers, Today and Help. The buttons are bigger, and each screen asks one thing at a time.
Underneath, the shop is the same. Simple mode shows the same customers, orders and payments as the full app, and the money still goes through the same till, so VAT, receipt numbers and your staff limits work as they do in Advanced mode. Roles and permissions apply in both modes: a button someone isn't allowed to use doesn't show in Simple mode either.
Switching between Simple and Advanced
- 1
Tap Simple in the top bar. On a phone, open the menu and tap Simple under Screen mode.
- 2
The menu shrinks to Counter, Orders, Customers, Today and Help, and the Counter becomes the home screen. On a phone the menu moves to a bar along the bottom.
- 3
Tap Advanced to get everything back. Switching only changes what you see: no sale, order or setting is changed.
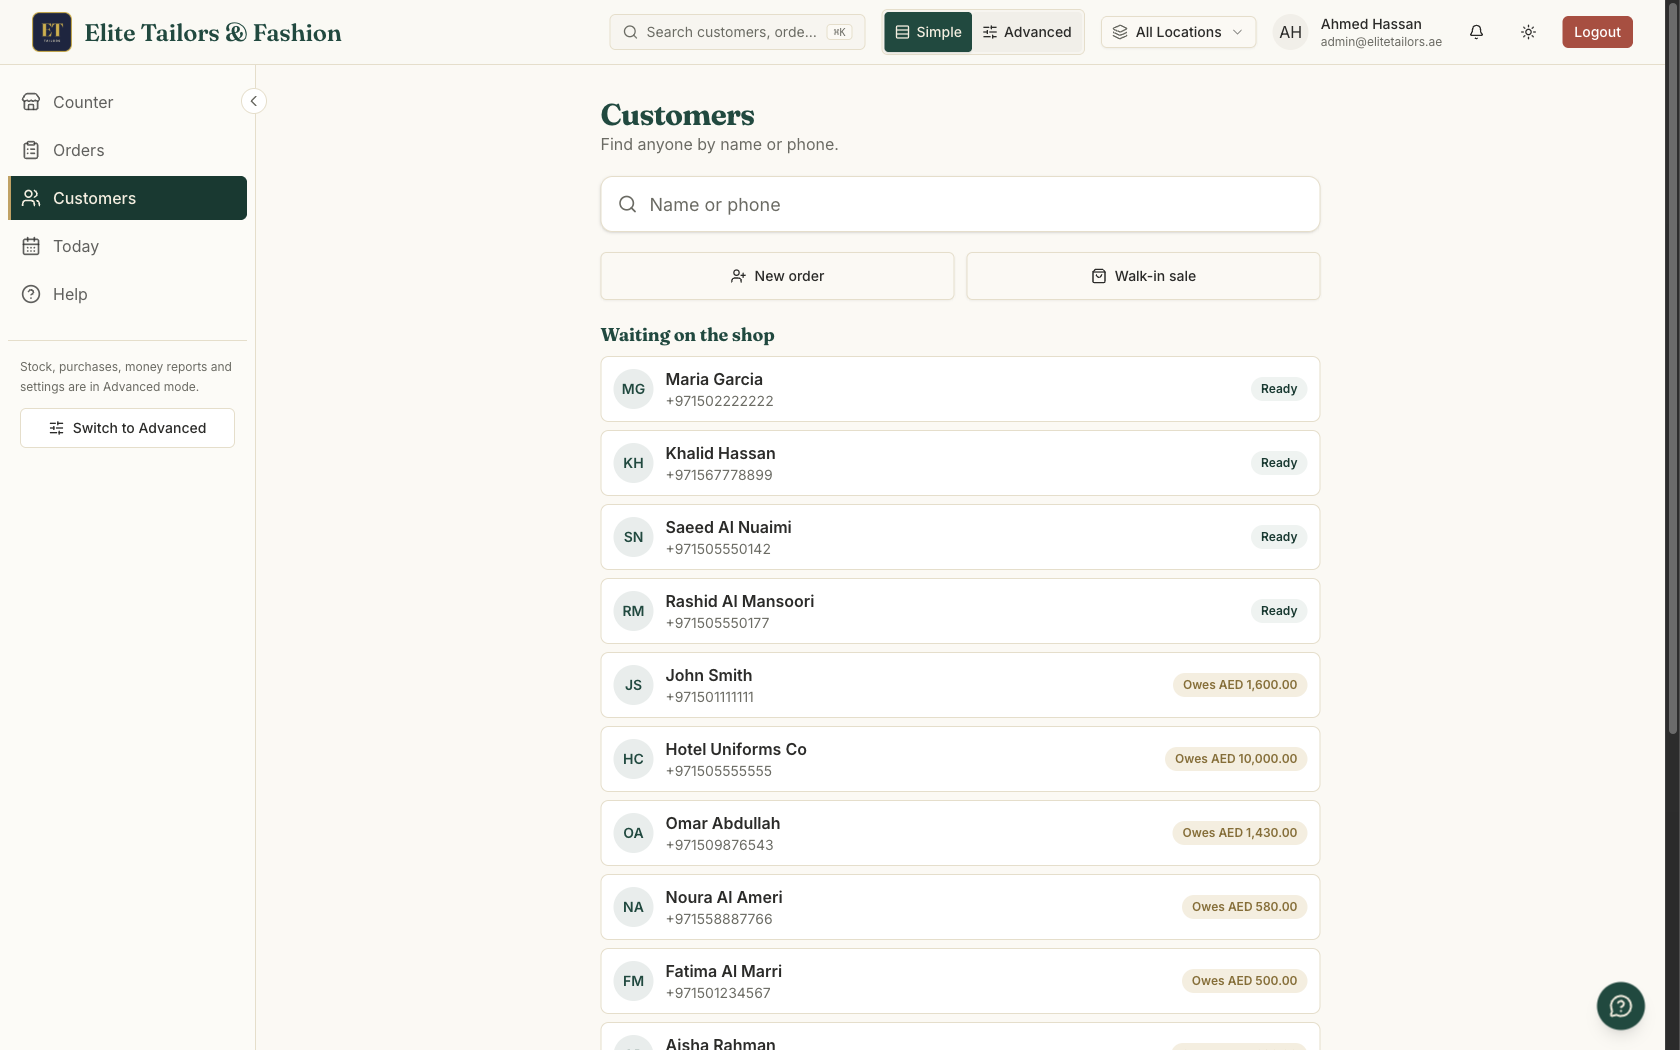
Each device remembers its own mode, and signing out leaves it as it is. The counter tablet can stay in Simple mode from one sign-in to the next while the owner's laptop stays in Advanced. Only staff whose role lets them use the till get the switch. Anyone else sees the full app, even on a device left in Simple mode. Simple mode comes with every plan, including the free trial.
In the app, the Help Center article Simple mode for the counter covers the switch, the Counter and the price keypad.
The Counter: what is the customer here for?
In Simple mode the Counter is the home screen. It asks one question, what is the customer here for, and three big tiles answer most visits. Sell opens the till for anything off the shelf, a fabric cut or an alteration. New stitching order takes a made-to-measure order one question at a time. Customer collecting opens the orders that are ready, so you can take the balance and hand them over. It lists the ready orders of every branch, since a customer can collect at any branch.
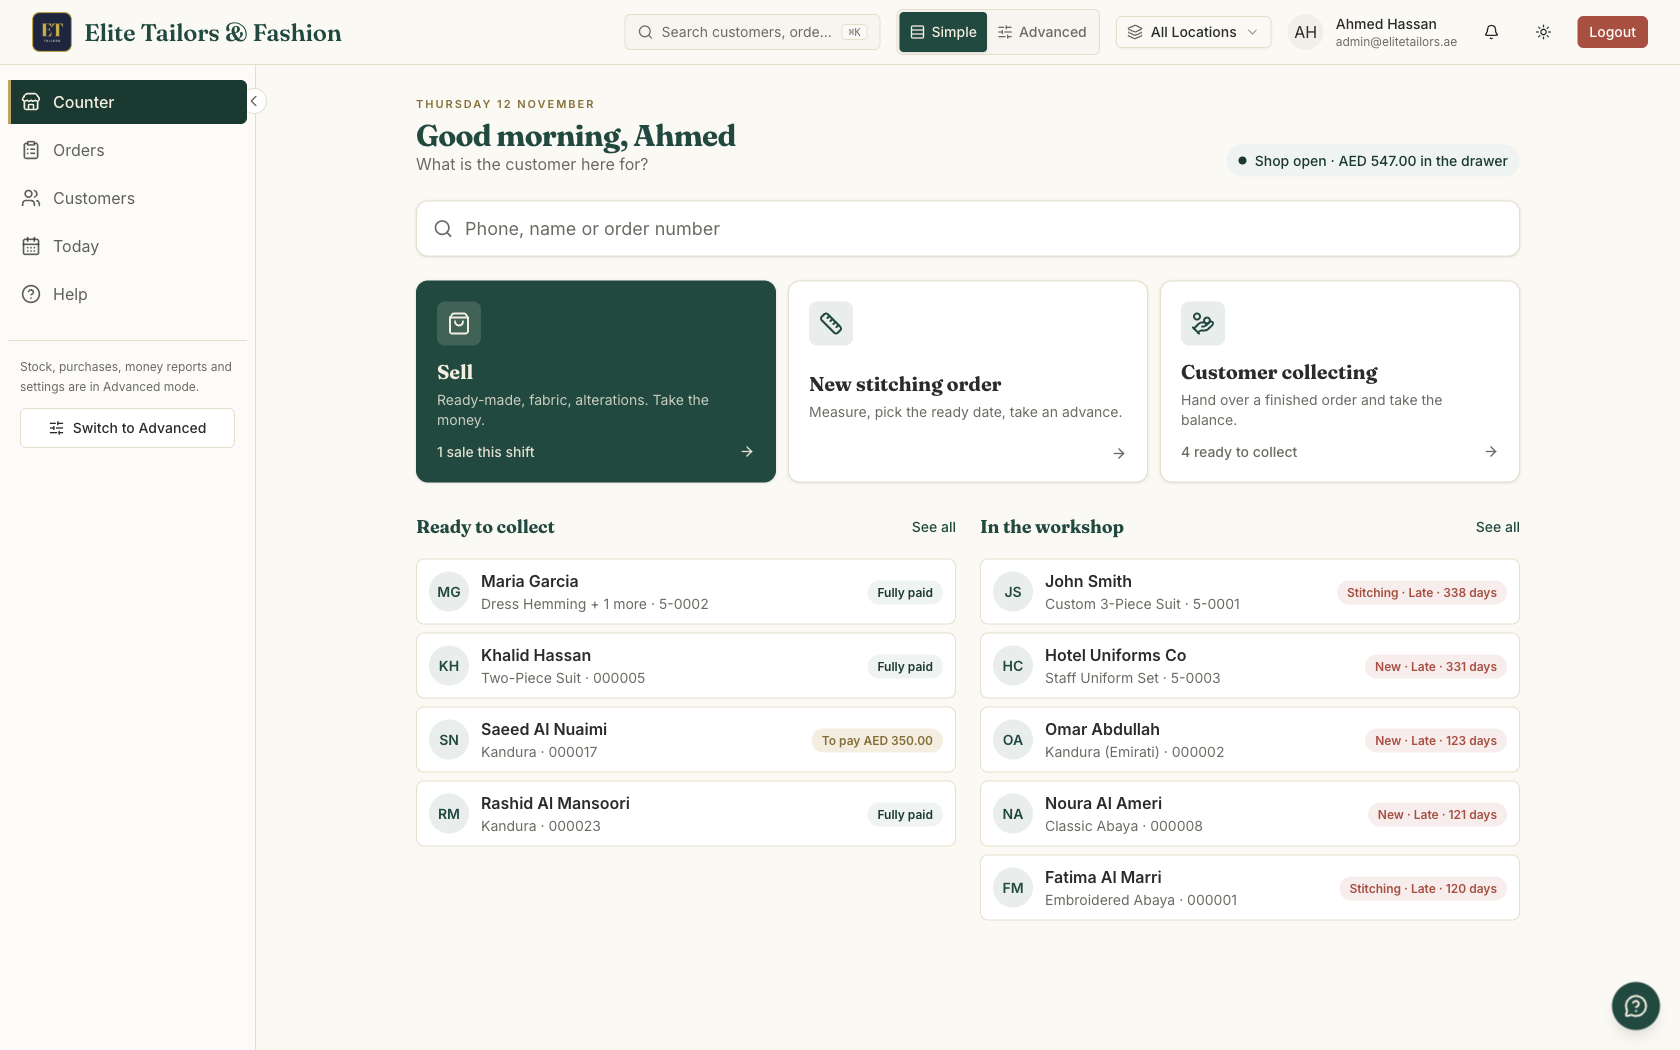
The search box above the tiles takes a phone number, a name or an order number. From a result you can start a new order for that customer, collect their ready order or open their page, and a number nobody has yet gets a New order button that starts with that number. Below the tiles, Ready to collect lists finished orders with what is left to pay, and In the workshop lists the next orders due.
Selling, and typing a price for an alteration
Sell opens the same till the shop uses in Advanced mode, with fewer buttons. Your stock and your services are on tiles, as usual. For an alteration, a hem or any price that isn't in your list, there is a number pad.
- 1
Tap Type a price above the items.
- 2
Type the amount on the number pad. The keyboard works too.
- 3
Tap what it was for: Alteration, Hemming, Stitching, Fabric, Ready-made or Other. That word goes on the receipt.
- 4
Tap Add to sale, then take the payment as usual.
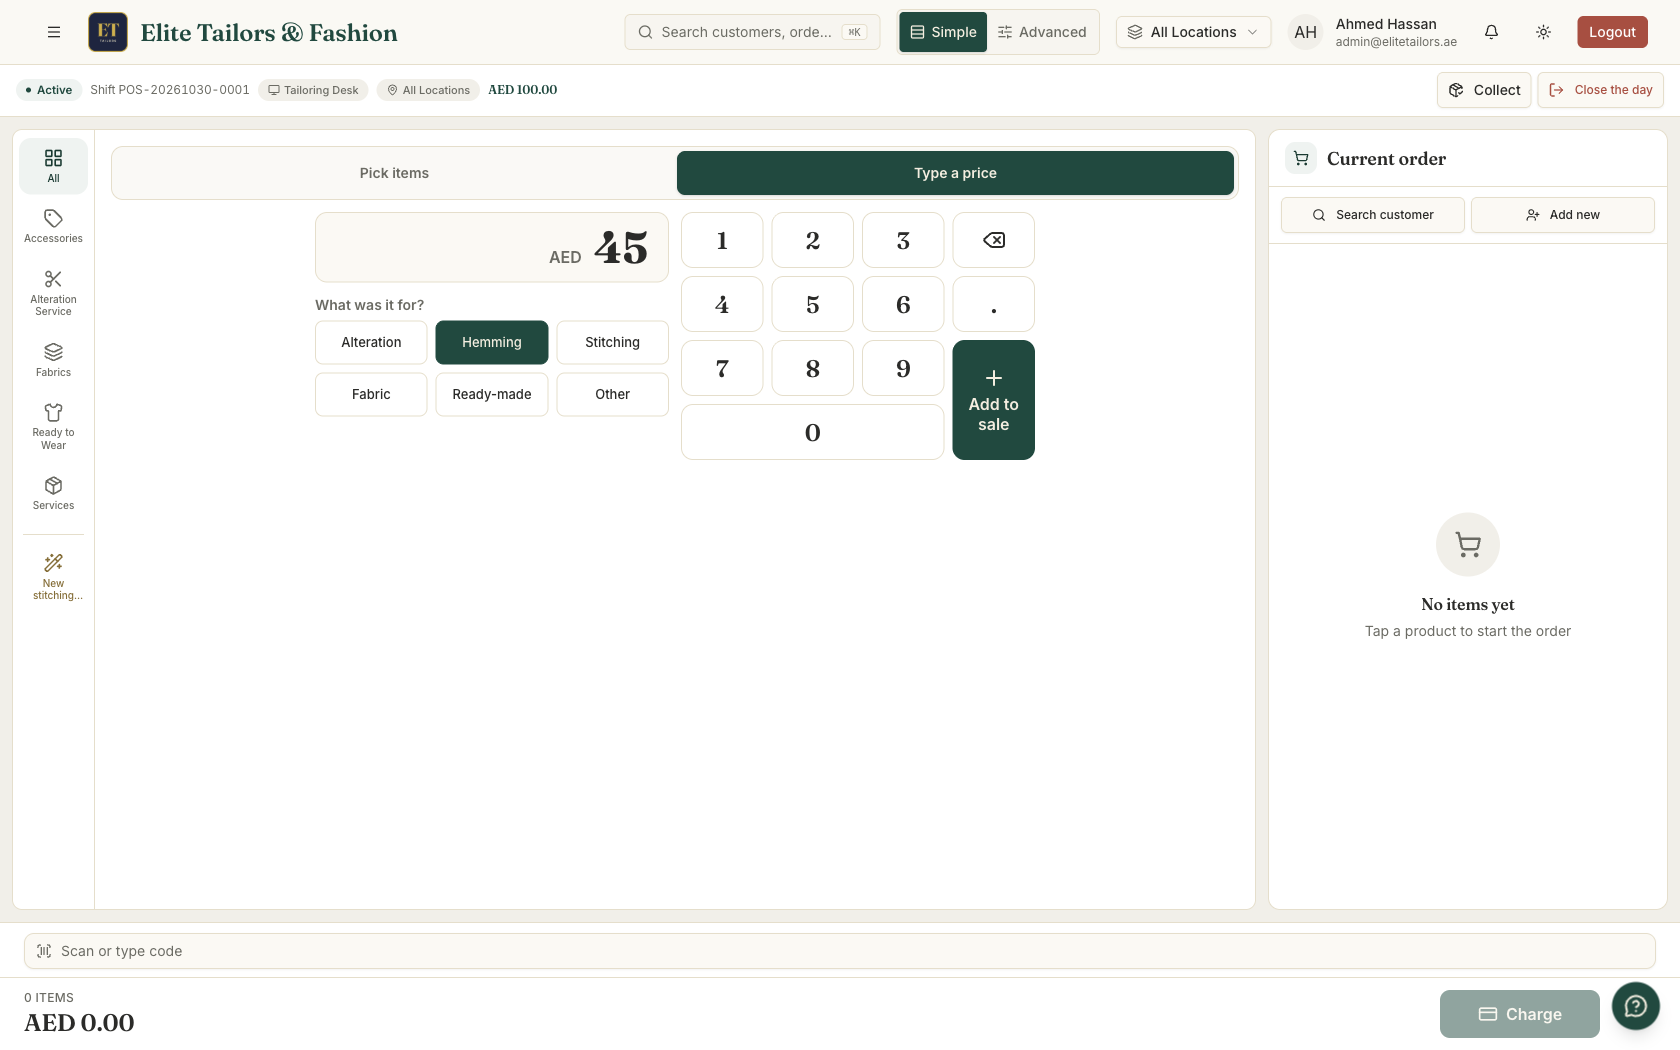
An alteration or a hem is taken as a job for later. The payment panel ticks Needs alteration, so you set the day the customer comes back for it. If they wait while it's done, untick it and it's a plain sale. The till in Simple mode also hides a few extras, such as Quick Access, the Sessions list and the camera scan. Collect at the top opens the orders that are ready, and Close the day closes the shift.
Taking a stitching order, one question at a time
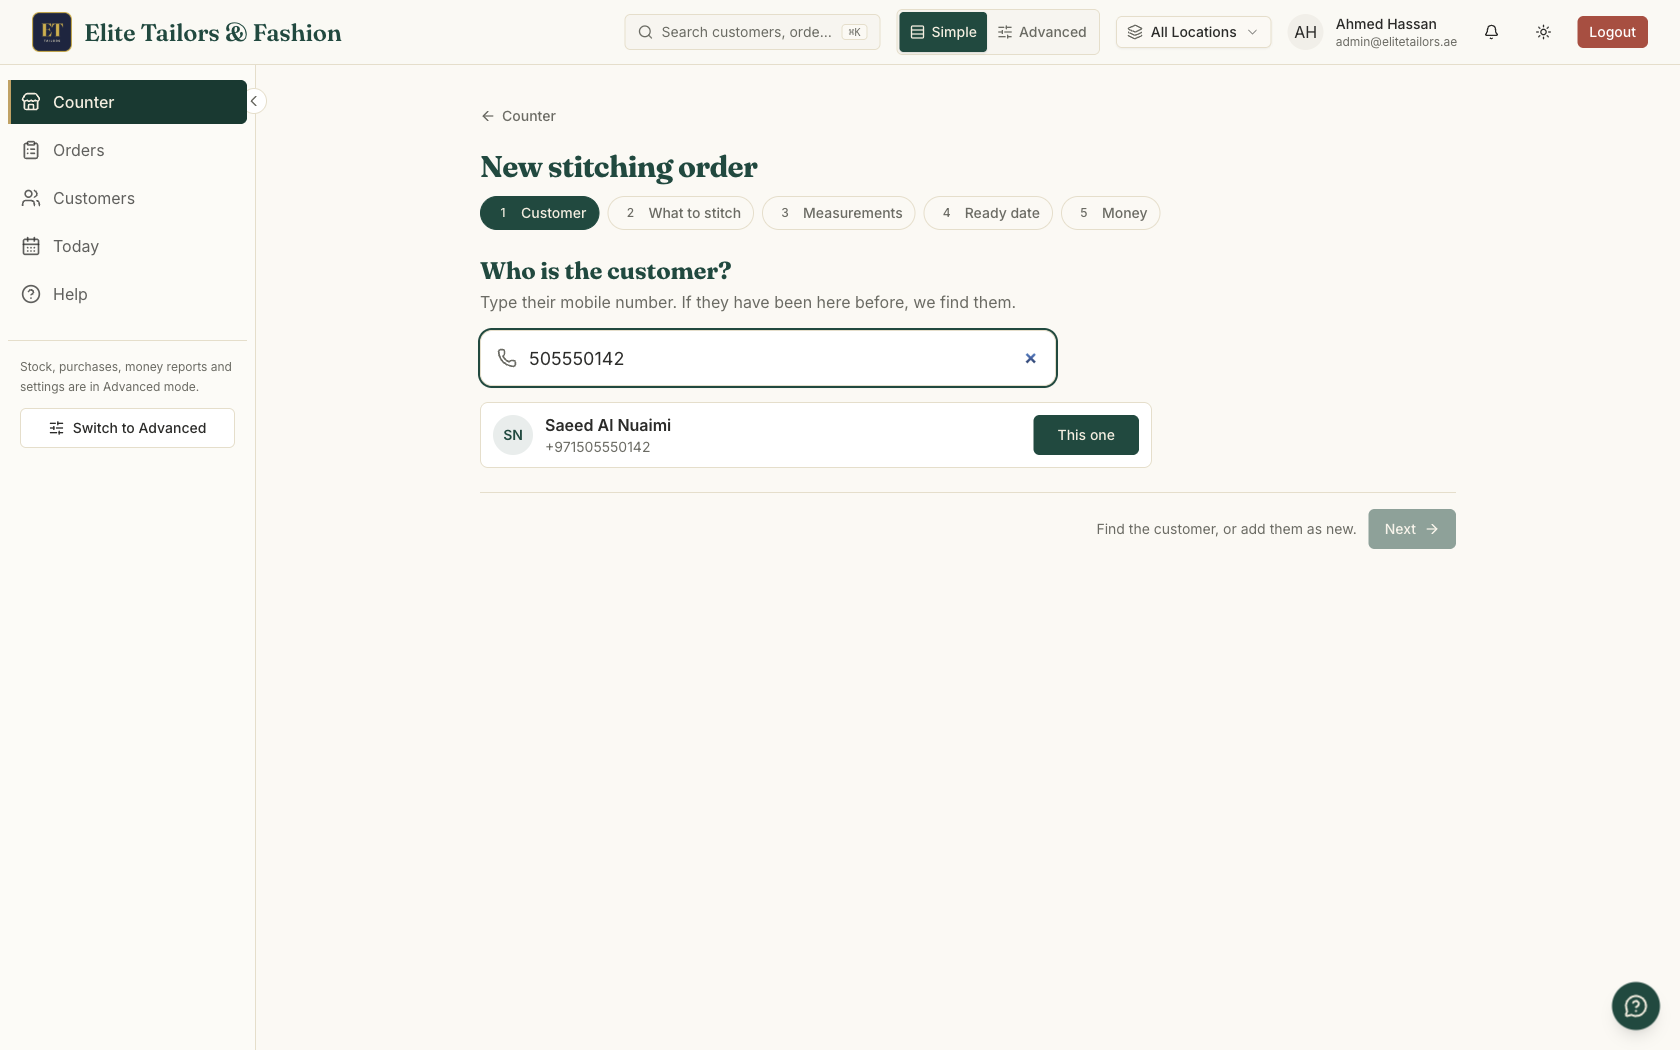
New stitching order is five short screens. Each one asks a single question, and Next stays off until it's answered, so nobody skips a step by accident. The order is saved with its advance on the till's shift, the same as an order taken at the till in Advanced mode.
- 1
Who is the customer? Type their mobile number. When they come up, tap This one. For a number the shop doesn't know yet, type their name and tap Add customer.
- 2
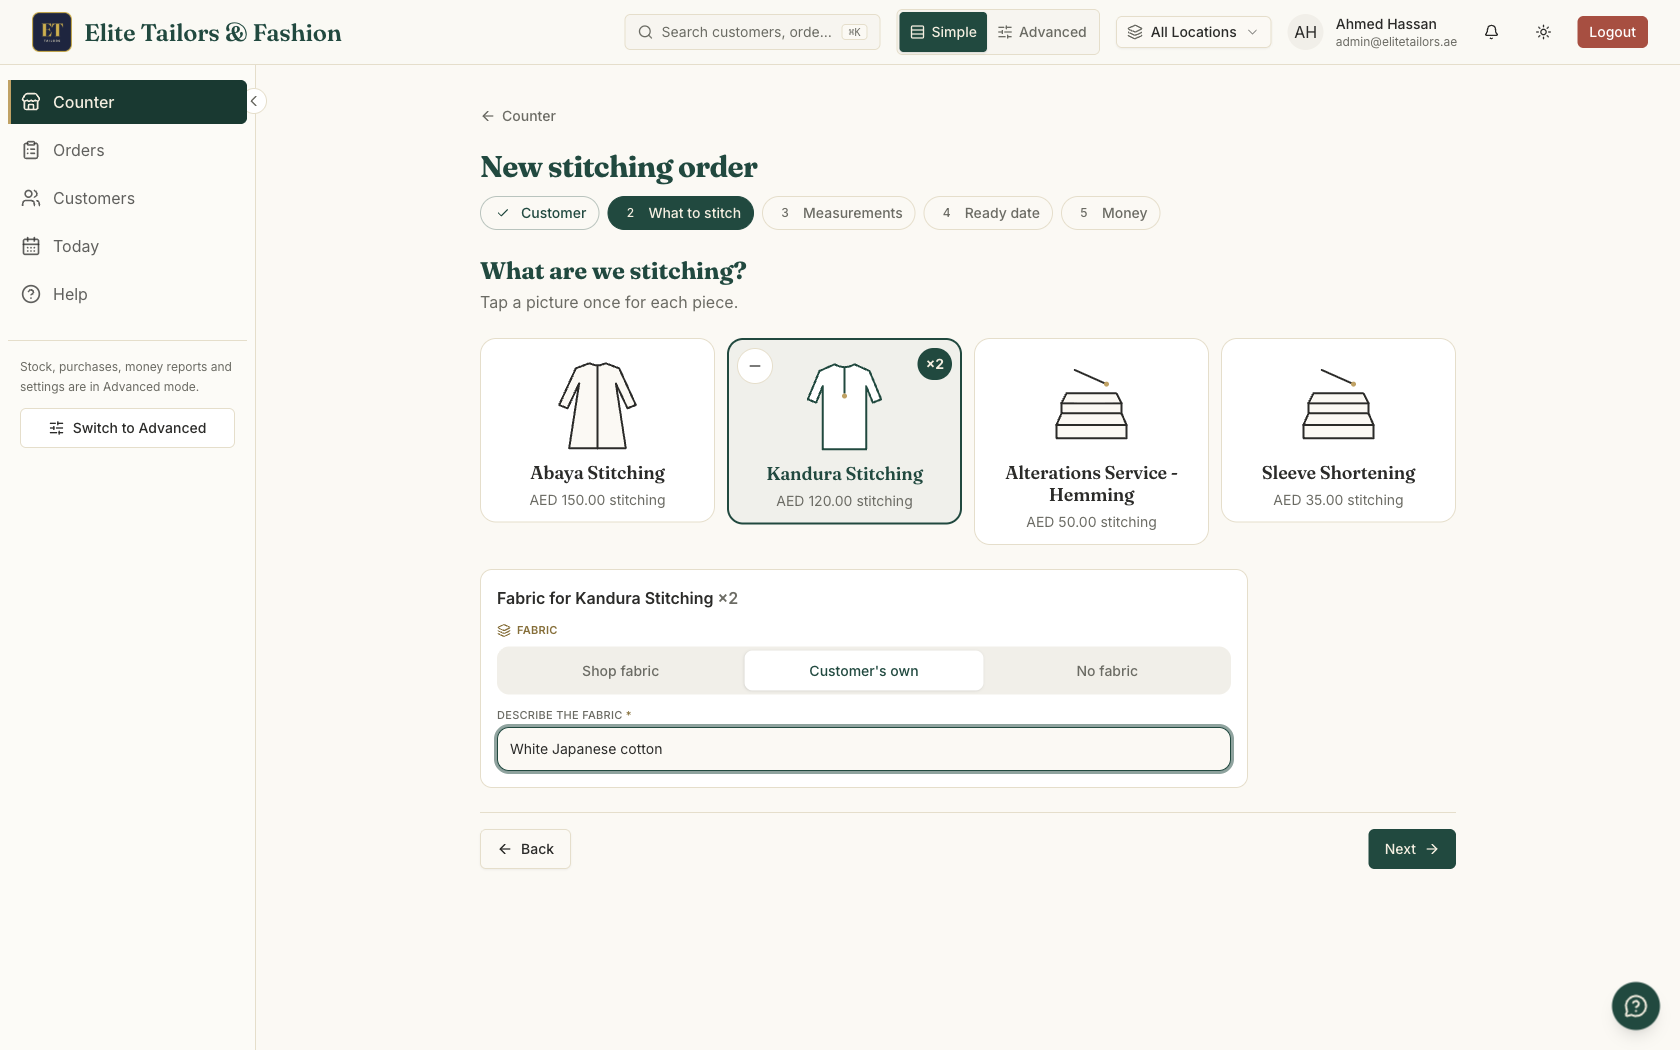
What are we stitching? Tap a garment picture once for each piece, so two taps on Kandura means two kanduras. Then choose the fabric: from your stock, the customer's own, or no fabric. Pieces of the same garment share one fabric.
- 3
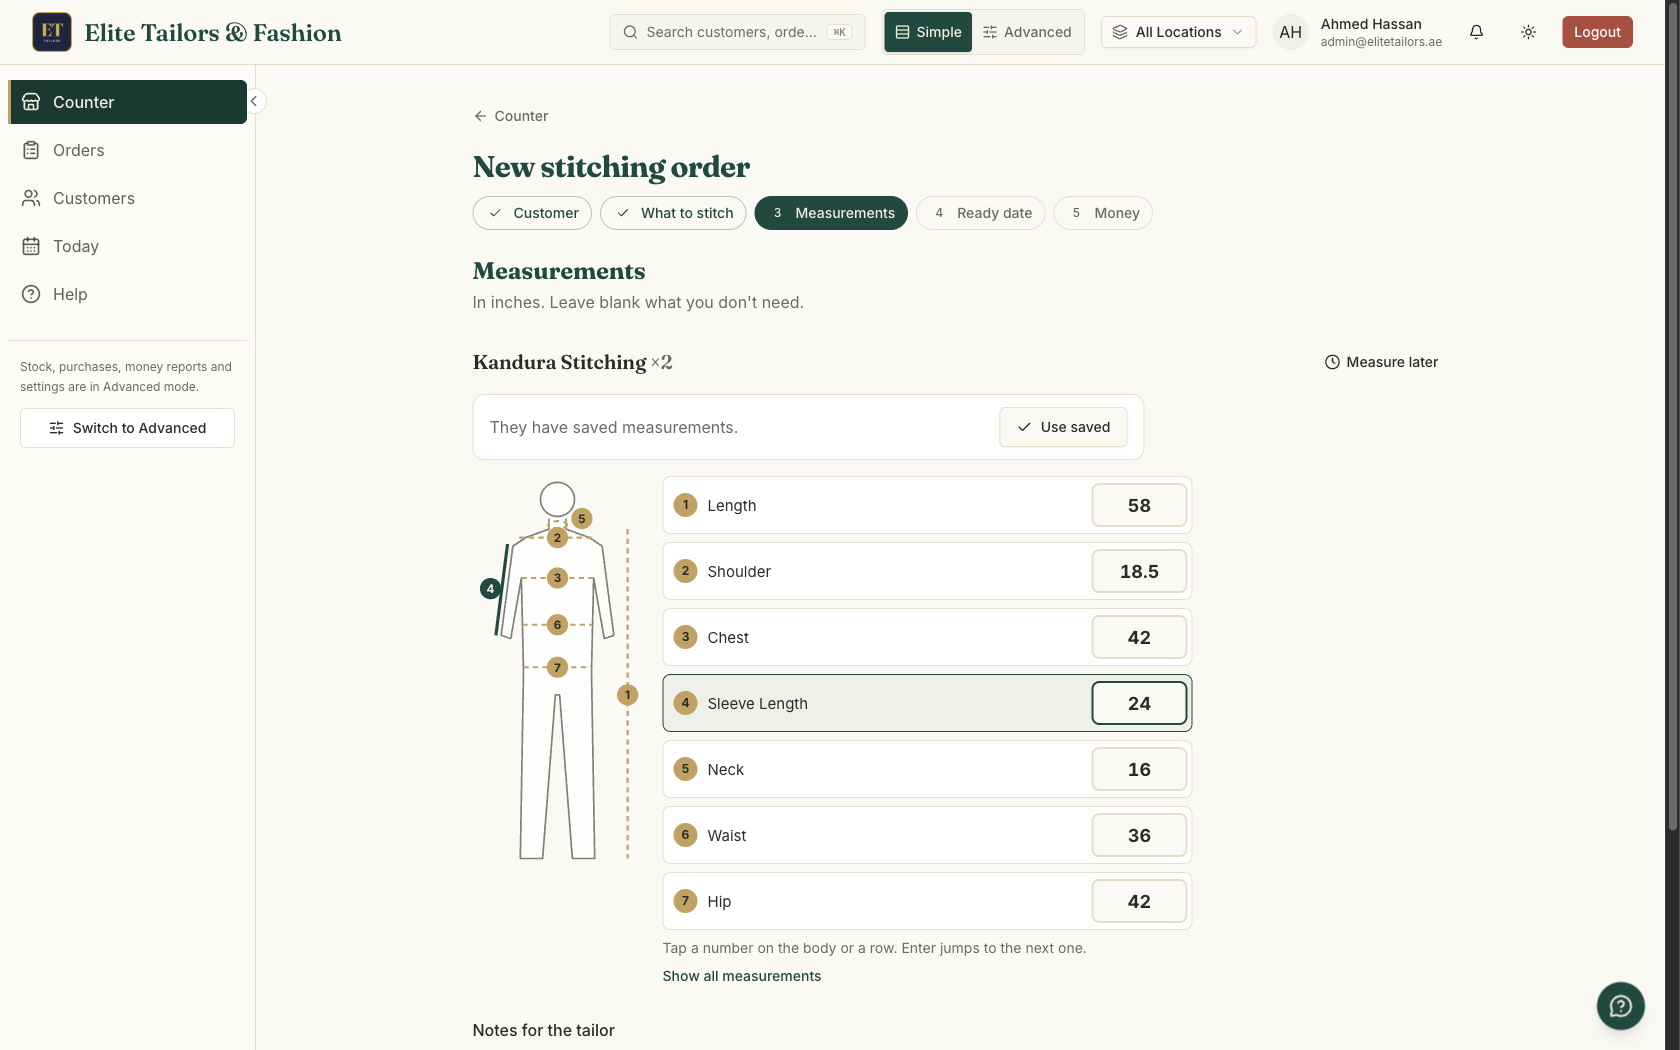
Measurements. Type each number in its row. The rows are numbered to match the points on a body outline, and Enter jumps to the next row. Saved measurements for the same garment are filled in straight away (Take new measures again), and any other saved set is one tap away with Use saved. Measure later leaves them for another day, and Notes for the tailor takes anything else the tailor should know.
- 4
When will it be ready? Tap one of the dates or pick another. The customer gets this date on their slip. Turn on Trial fitting first for a piece they should try on before it's finished, and add the trial date if you know it.
- 5
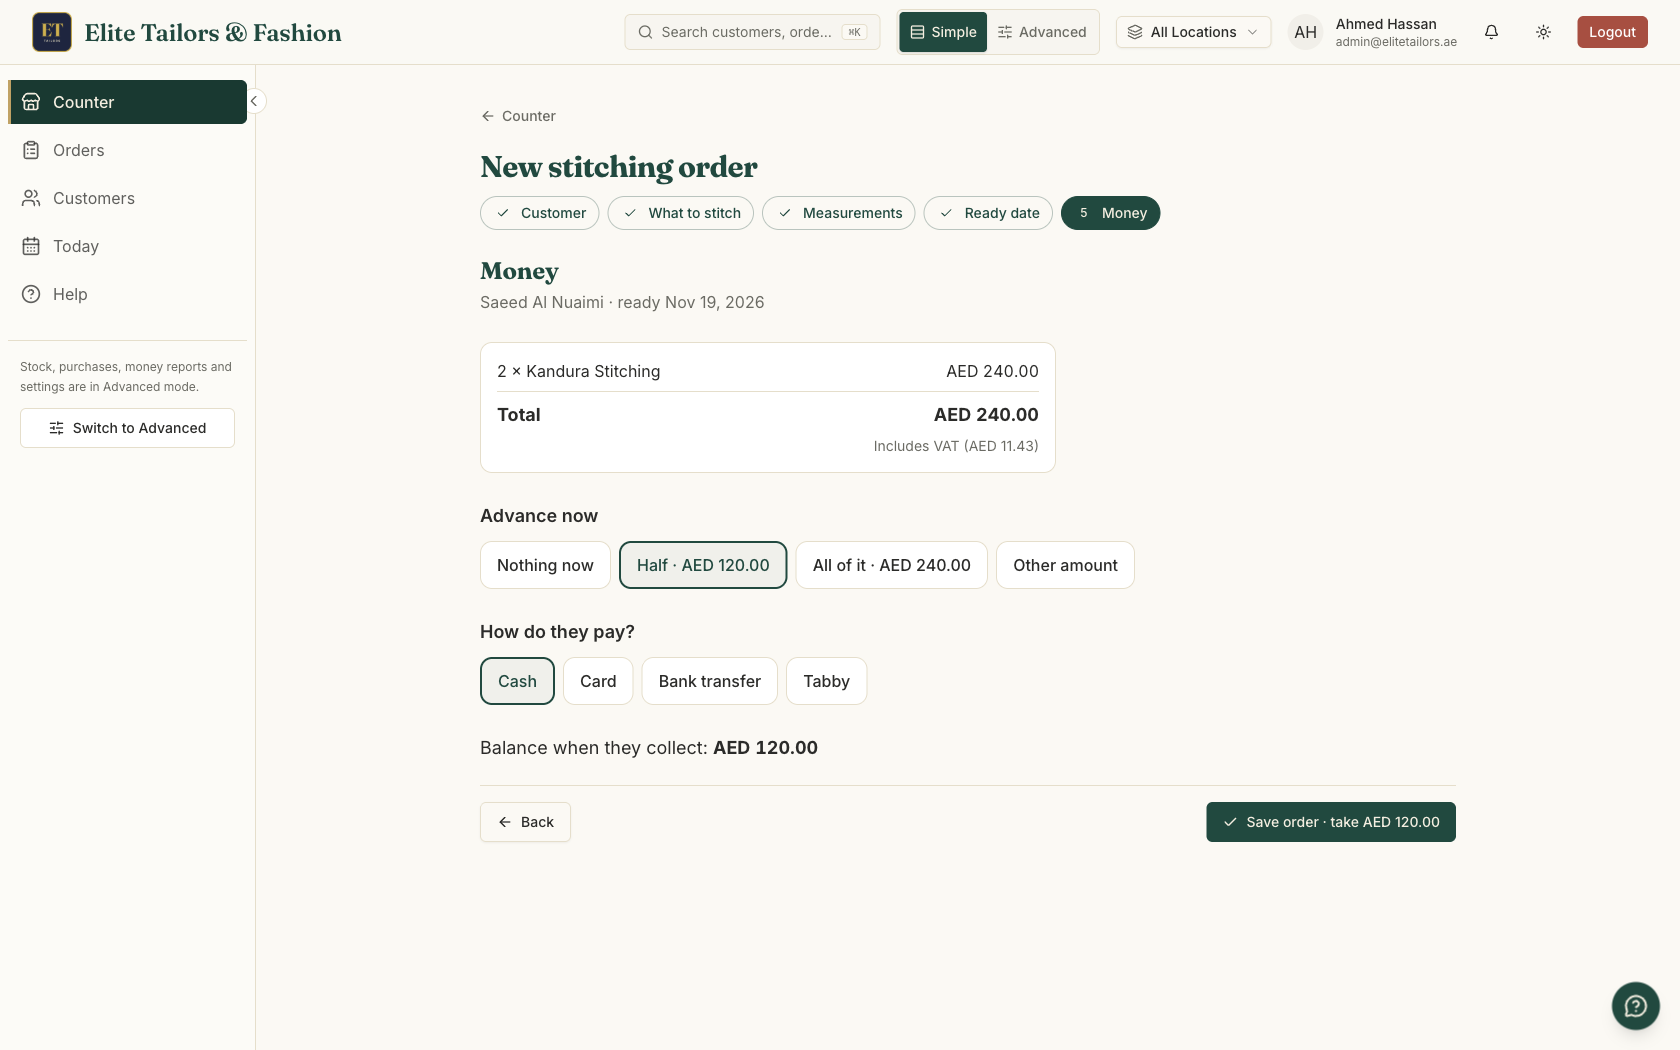
Money. Check the total, then choose the advance: Nothing now, Half, All of it or Other amount. Pick how they pay and tap Save order. The balance they pay when they collect is shown above the button.
- 6
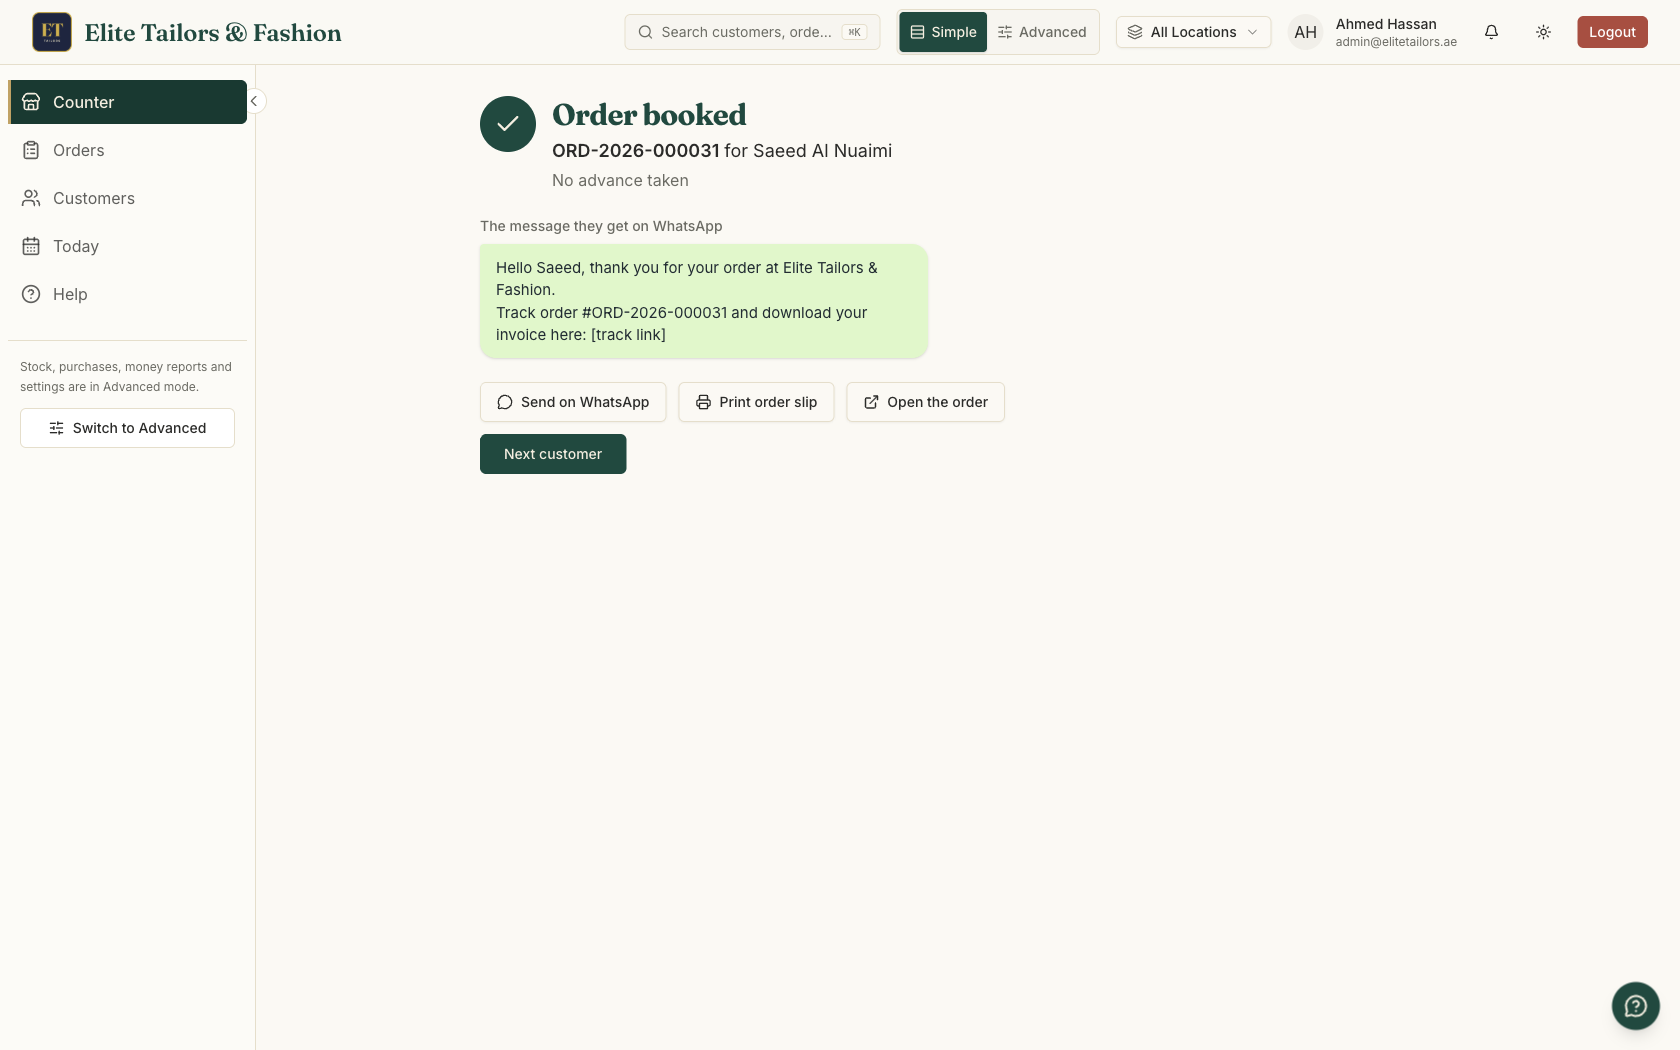
Order booked. Tap Send on WhatsApp to send the customer their tracking link from your own WhatsApp, Print order slip for the paper slip, or Next customer to go back to the Counter.
The garment pictures come from the stitching services you sell. Name a service Kandura, Abaya, Shirt, Trouser or Jalabiya and it gets the matching picture. Anything else gets a general one.
The shop must be open at the till to save an order, even with no advance. If it isn't, the screen says so, and Open the shop opens the shift right there without losing the order.
A discount, a payment split across two methods or a ready-made item sold with the order still go through the till in Advanced mode. In the app, the Help Center article Taking a stitching order in Simple mode has every step. For what an order record holds from then on, see how a tailor order tracking system works.
The orders board
Orders shows every open order on a board with four columns: New (taken, not started), Stitching (being made, or back for an alteration), Trial fitting and Ready. Each card shows the customer, the garments, when it's due and a row of dots for how far along it is. The due date turns red when the order is late or due within a day.
- 1
In New, tap Start stitching when work begins.
- 2
In Stitching, tap Stitched when it's sewn. If a garment still has a trial fitting to do, the order moves to Trial fitting. If not, it's marked Ready. An order back for an alteration has Altered instead, which marks it Ready.
- 3
In Trial fitting, tap Fitting done once the customer has tried it on, and the order is marked Ready.
- 4
In Ready, tap Hand over. The till opens on that order, where you take the balance and hand it over.
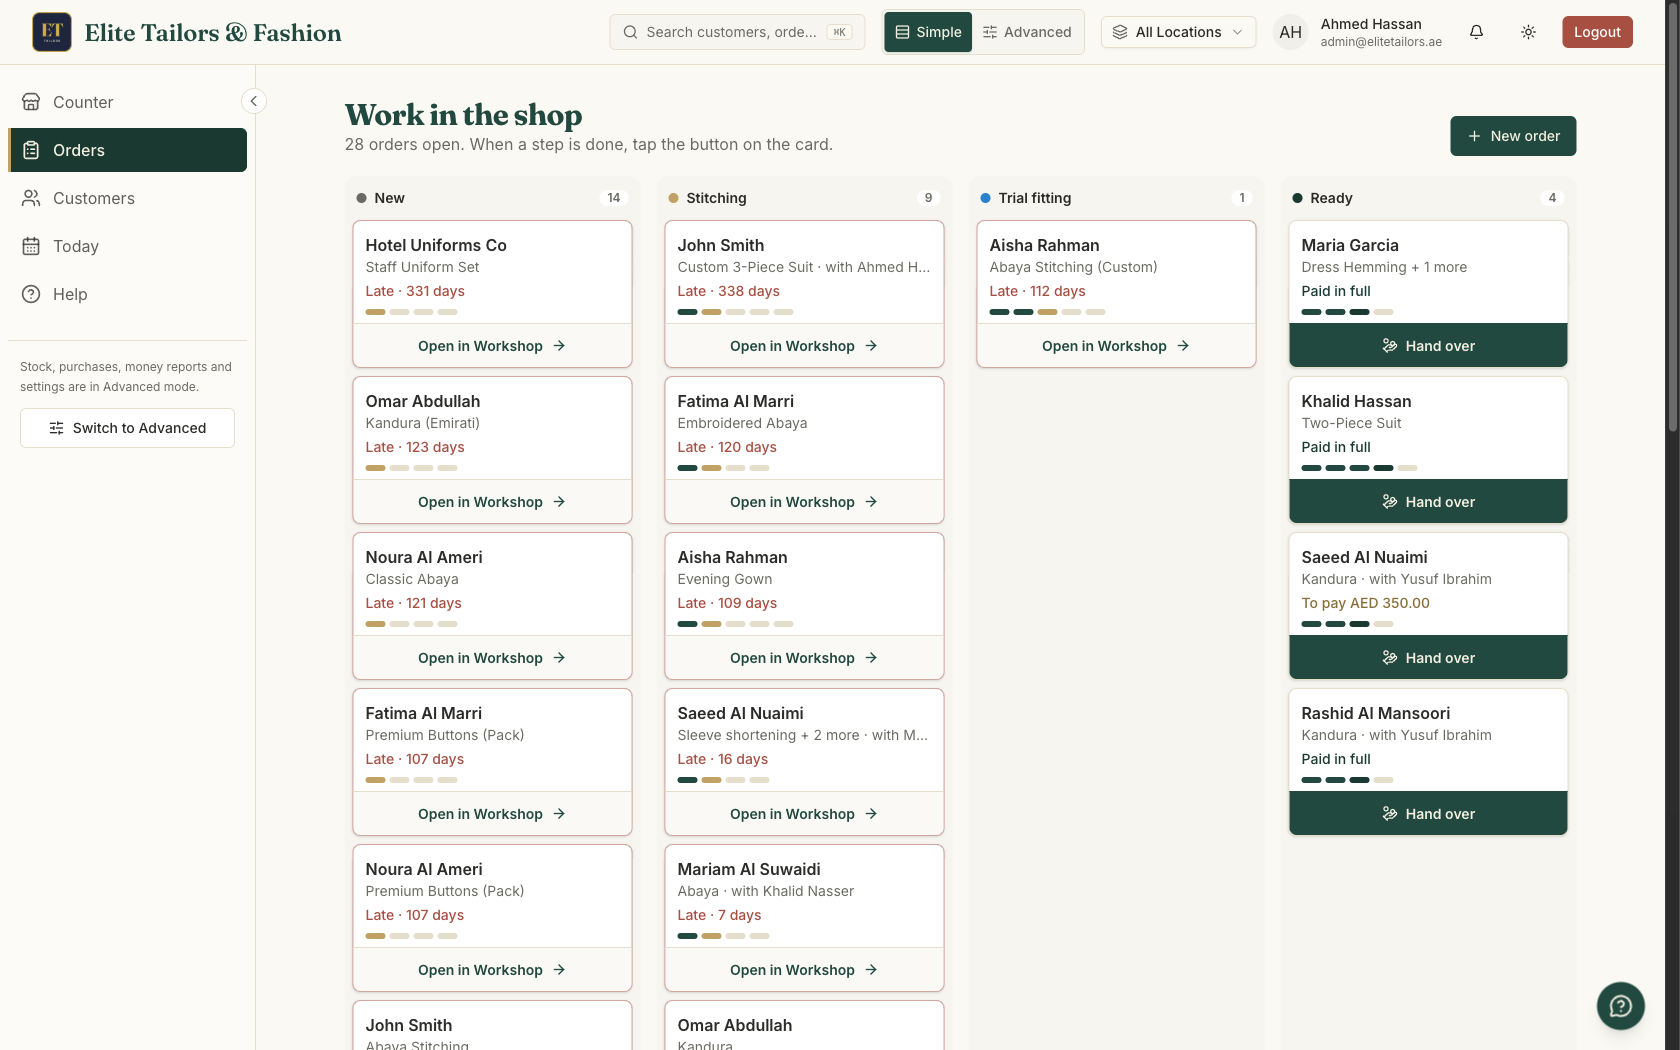
If your shop uses workshop tracking, the job cards move orders along, so cards that aren't Ready show Open in Workshop in place of a button. Workshop tracking comes with the free trial and the Expansion and Enterprise plans.
When an order is marked Ready, the app offers to tell the customer. Send ready message opens WhatsApp with the message, including any balance, for you to check and send yourself. Nothing goes to a customer unless someone at the shop sends it.
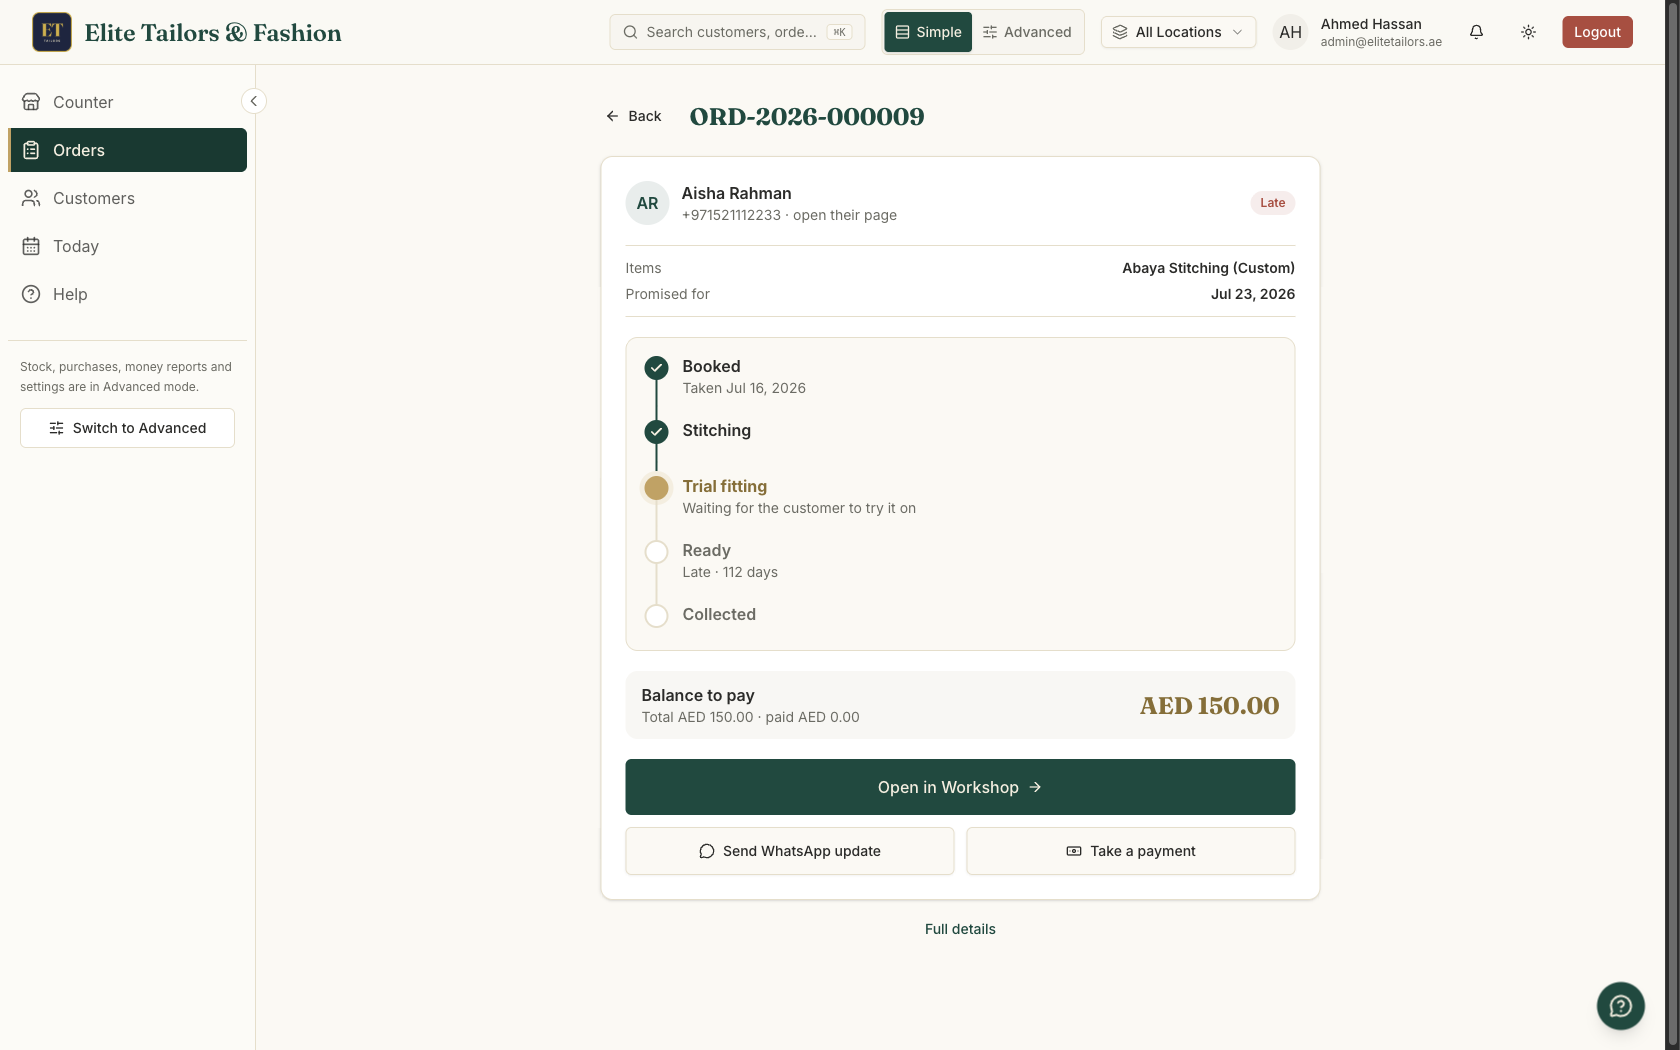
Tap a card to open the order. It shows the customer, the garments, the promised date, the steps so far and the balance. The big button is the same one as on the card, and under it Send WhatsApp update opens the order's tracking message and Take a payment opens the order at the till. Full details opens the full order page for printing or changes.
A customer's page, and handing over
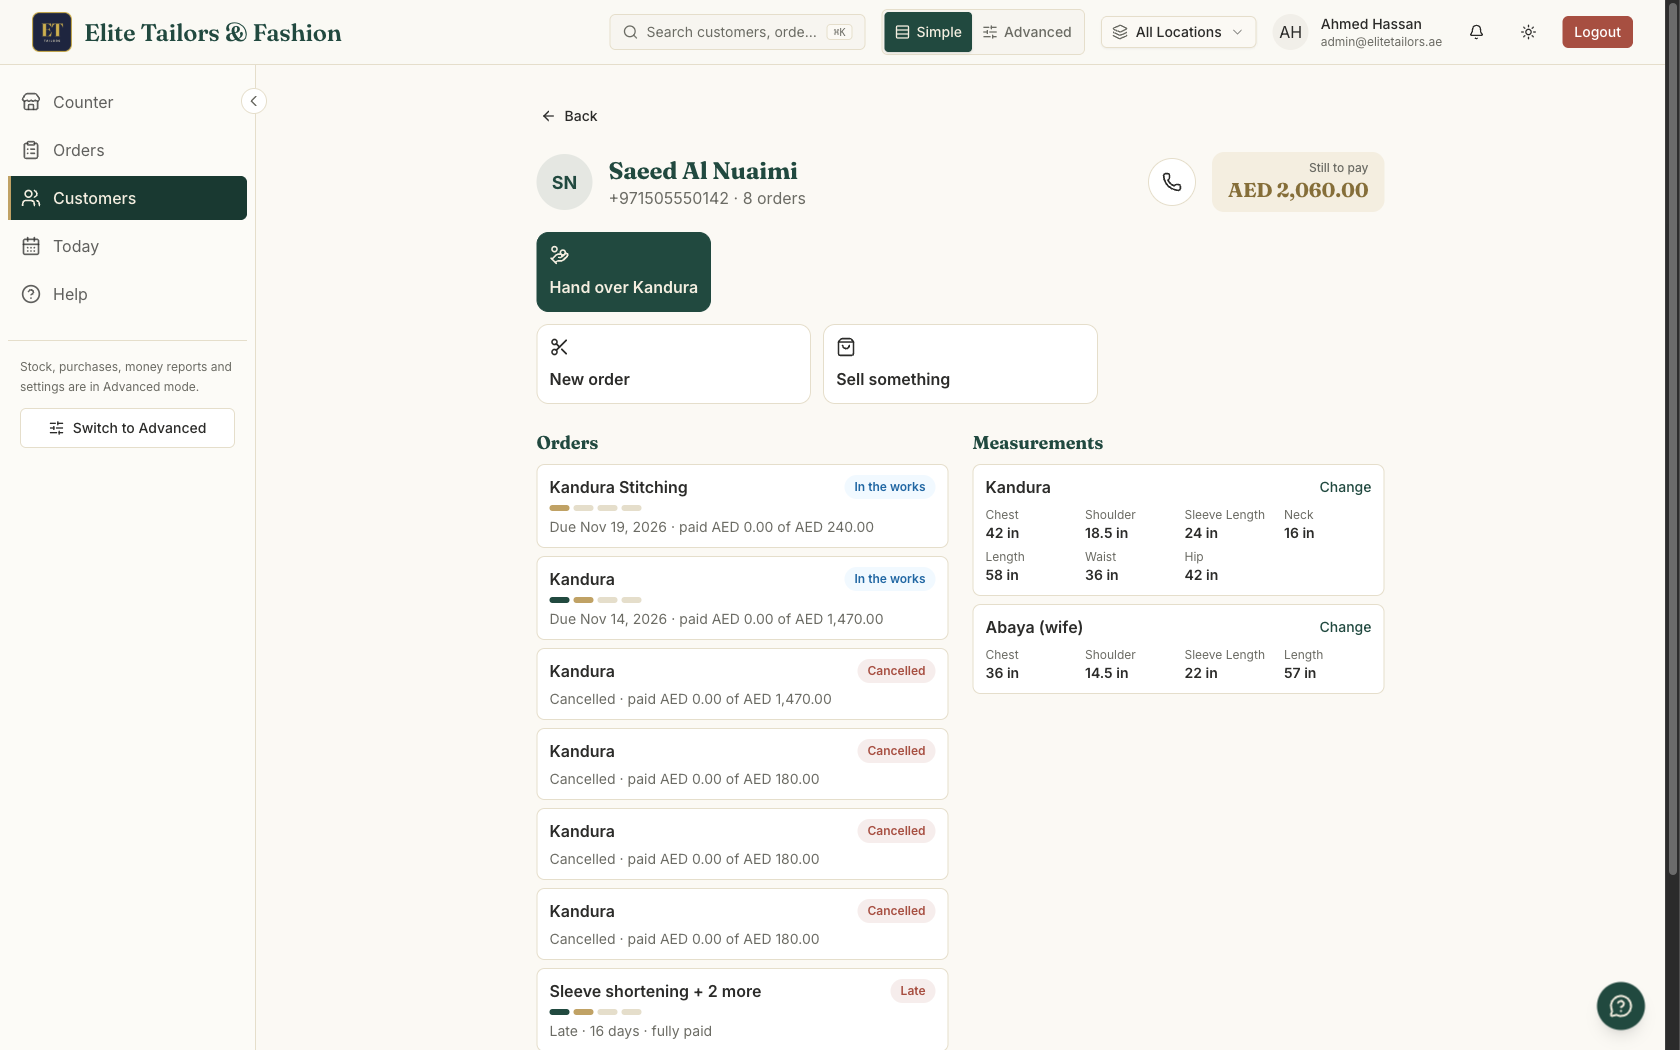
Customers opens on the people the shop is waiting on: those with something ready to collect come first, then those who still owe. Type a name or phone number to find anyone else.
A customer's page shows what they still owe, their orders with how far along each one is, and their saved measurements if your role can see them. Hand over appears when an order is ready. It opens the till on that order, where you take the balance and hand it over. New order starts a stitching order for them, and Sell something opens the till with them on the sale.
In the app, the Help Center article Orders, customers and Today in Simple mode covers the board, the order page, the customers and Today.
Today, and closing the day
Today is the shop's diary. It lists what is Ready to collect, the Trial fittings booked for today, what is Late or due today and what Must be ready tomorrow. The strip across the top covers two days back and four days ahead. Tap a day to see its fittings and what is due then.
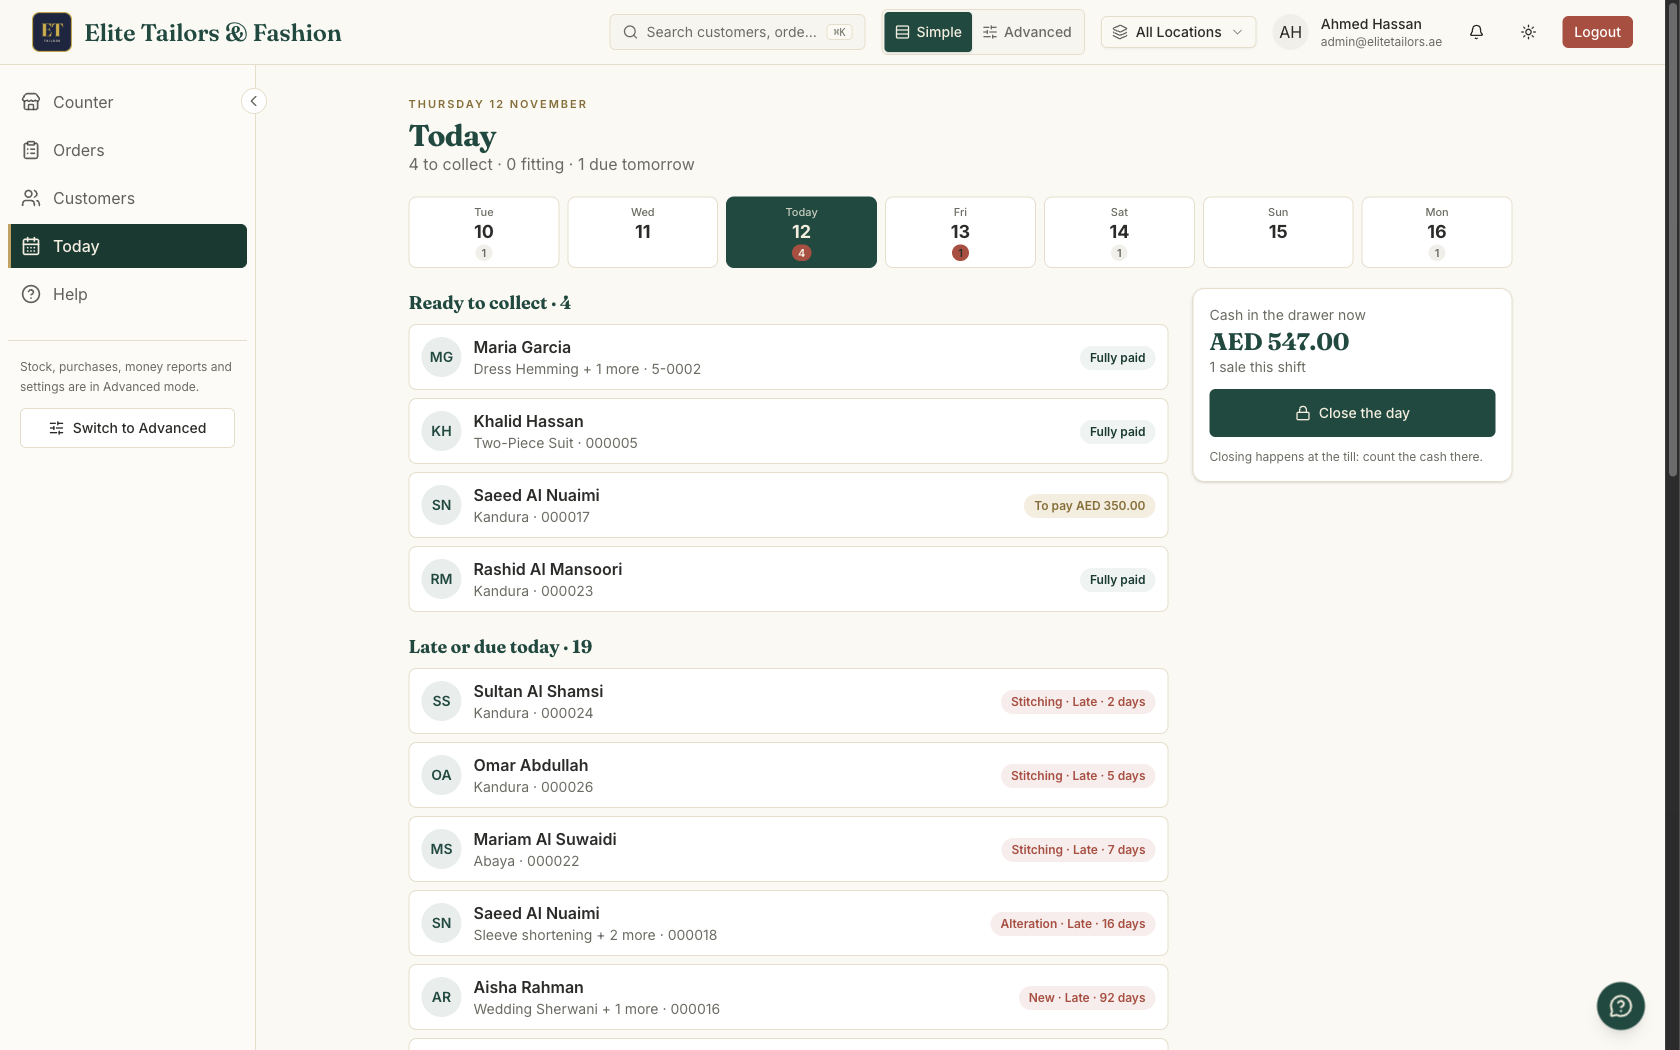
The panel on the side shows the cash that should be in the drawer and the sales this shift. Close the day opens the till, where you count the cash and close the shift as you would in Advanced mode. Help in the Simple menu opens Quick answers for the counter, a short Help Center page for these everyday jobs.
On a phone
Simple mode works on a phone as well. The menu becomes a bar along the bottom of the screen, and the Simple and Advanced switch moves into the menu, under Screen mode. Four columns don't fit side by side on a phone, so on the orders board you tap a step at the top to see its orders.
What stays in Advanced mode
Simple mode is for the counter, so the back office stays in Advanced mode: stock and purchases, suppliers, expenses, money reports, VAT, staff and settings. So do a few counter jobs that need more on the screen, such as a discount or a split payment on a stitching order. Tap Advanced in the top bar to reach them, and Simple to come back.
You can run both at once: the counter tablet in Simple mode and the owner's computer in Advanced. The video tutorials on taking a tailoring order, the orders board and closing the day were filmed in Advanced mode, and show the same jobs with every option on the screen. For the till itself, see how a point of sale works at a tailoring counter.
Common questions
What is Simple mode in TailorSync?
A shorter version of the app for counter staff. It keeps the Counter, Orders, Customers, Today and Help, with big buttons and one question per screen, and leaves stock, purchases, reports and settings in Advanced mode. It shows the same shop data as the full app, so there is nothing to set up twice.
Which plans include Simple mode?
Every plan, including the free 30-day trial. Staff whose role lets them use the till get the Simple and Advanced switch in the top bar.
Can the owner keep the full app while the counter uses Simple mode?
Yes. Each device remembers its own mode, so the counter tablet can stay in Simple mode while the owner's laptop or phone stays in Advanced. Switching only changes what that device shows.
Does Simple mode change VAT, receipts or payments?
No. Sales, stitching orders and balances all go through the same till as in Advanced mode, with the same VAT, receipt numbering and staff limits. Simple mode only changes what the screens show.
Does Simple mode send WhatsApp messages by itself?
No. It prepares the message, such as the tracking link after an order or the ready message when an order is finished, and opens WhatsApp on your own number for you to check and send.
Can counter staff use Simple mode on a phone?
Yes. On a phone the menu becomes a bar along the bottom of the screen, and the Simple and Advanced switch is in the menu under Screen mode.
Watch it
- Season 4, Episode 2: Simple mode for the counter (3:07 video)
- Season 1, Episode 9: Take a tailoring order (3:36 video)
- Season 1, Episode 8: Your first sale (2:32 video)
- Season 3, Episode 2: Your orders board (1:56 video)
- Season 1, Episode 13: Close the day (3:12 video)
Keep reading