Setting up a tailoring shop in TailorSync, from scratch to your first order
To set up a tailoring shop in TailorSync, work from the top down: enter your business details and tax registration once in Settings, add any extra branches, load the fabrics you stock and the stitching services you sell, then add your first customer with their measurements and write their order. The trap is trying to make everything perfect before you take a single job, and you do not have to. A morning on the shop-wide settings, plus one item and one customer, is enough to ring up real work the same day. This guide walks the setup in the order that saves the most backtracking, with the reason each piece matters.
Do the shop-wide setup once
TailorSync keeps two kinds of information. There is the shop-wide setup you enter once, your company details, tax registration and prices, and there is the daily work that leans on it, the orders, sales and payments. Get the first kind right in your opening week and the rest turns fast, because every invoice already carries your logo and VAT rate, and every returning customer keeps their measurements. Nearly all of the setup lives in Settings, and the shop-wide sections show for a tenant admin, which is the account you signed up with.
Your first-week checklist
- 1
Enter your business details and branding. In Settings, open Business and set your company name (required), upload a logo, and pick your brand colours. Add your address, phone, email and website, since these print in the header of every invoice, receipt and order form.
- 2
Set your tax and TRN. Still in Business, open Financial Settings. Choose your country so the currency and VAT rate line up (the UAE is
AEDat 5%), then set your registration status. If you are VAT registered, fill in your rate, the labelVAT, the identifierTRNand your tax number. - 3
Add branches, if you have more than one. When your plan includes branches, add your other locations under Settings, Branches. Your original data stays at the Main Location, and you decide what each branch shares.
- 4
Load what you sell. In Inventory, add your fabrics as products (counted stock) and your stitching work as services (no stock, just a cost and a price). Set up a category first if the list is empty.
- 5
Add a customer and their measurements. In Clients, add a customer with their phone number, then open their Measurements tab and save a set. You measure once and reuse it on every future order.
- 6
Write your first order. In Orders, tap New order, pick the customer, and their active measurements come up on their own. Add the garment, set a delivery date, take a deposit, and save.
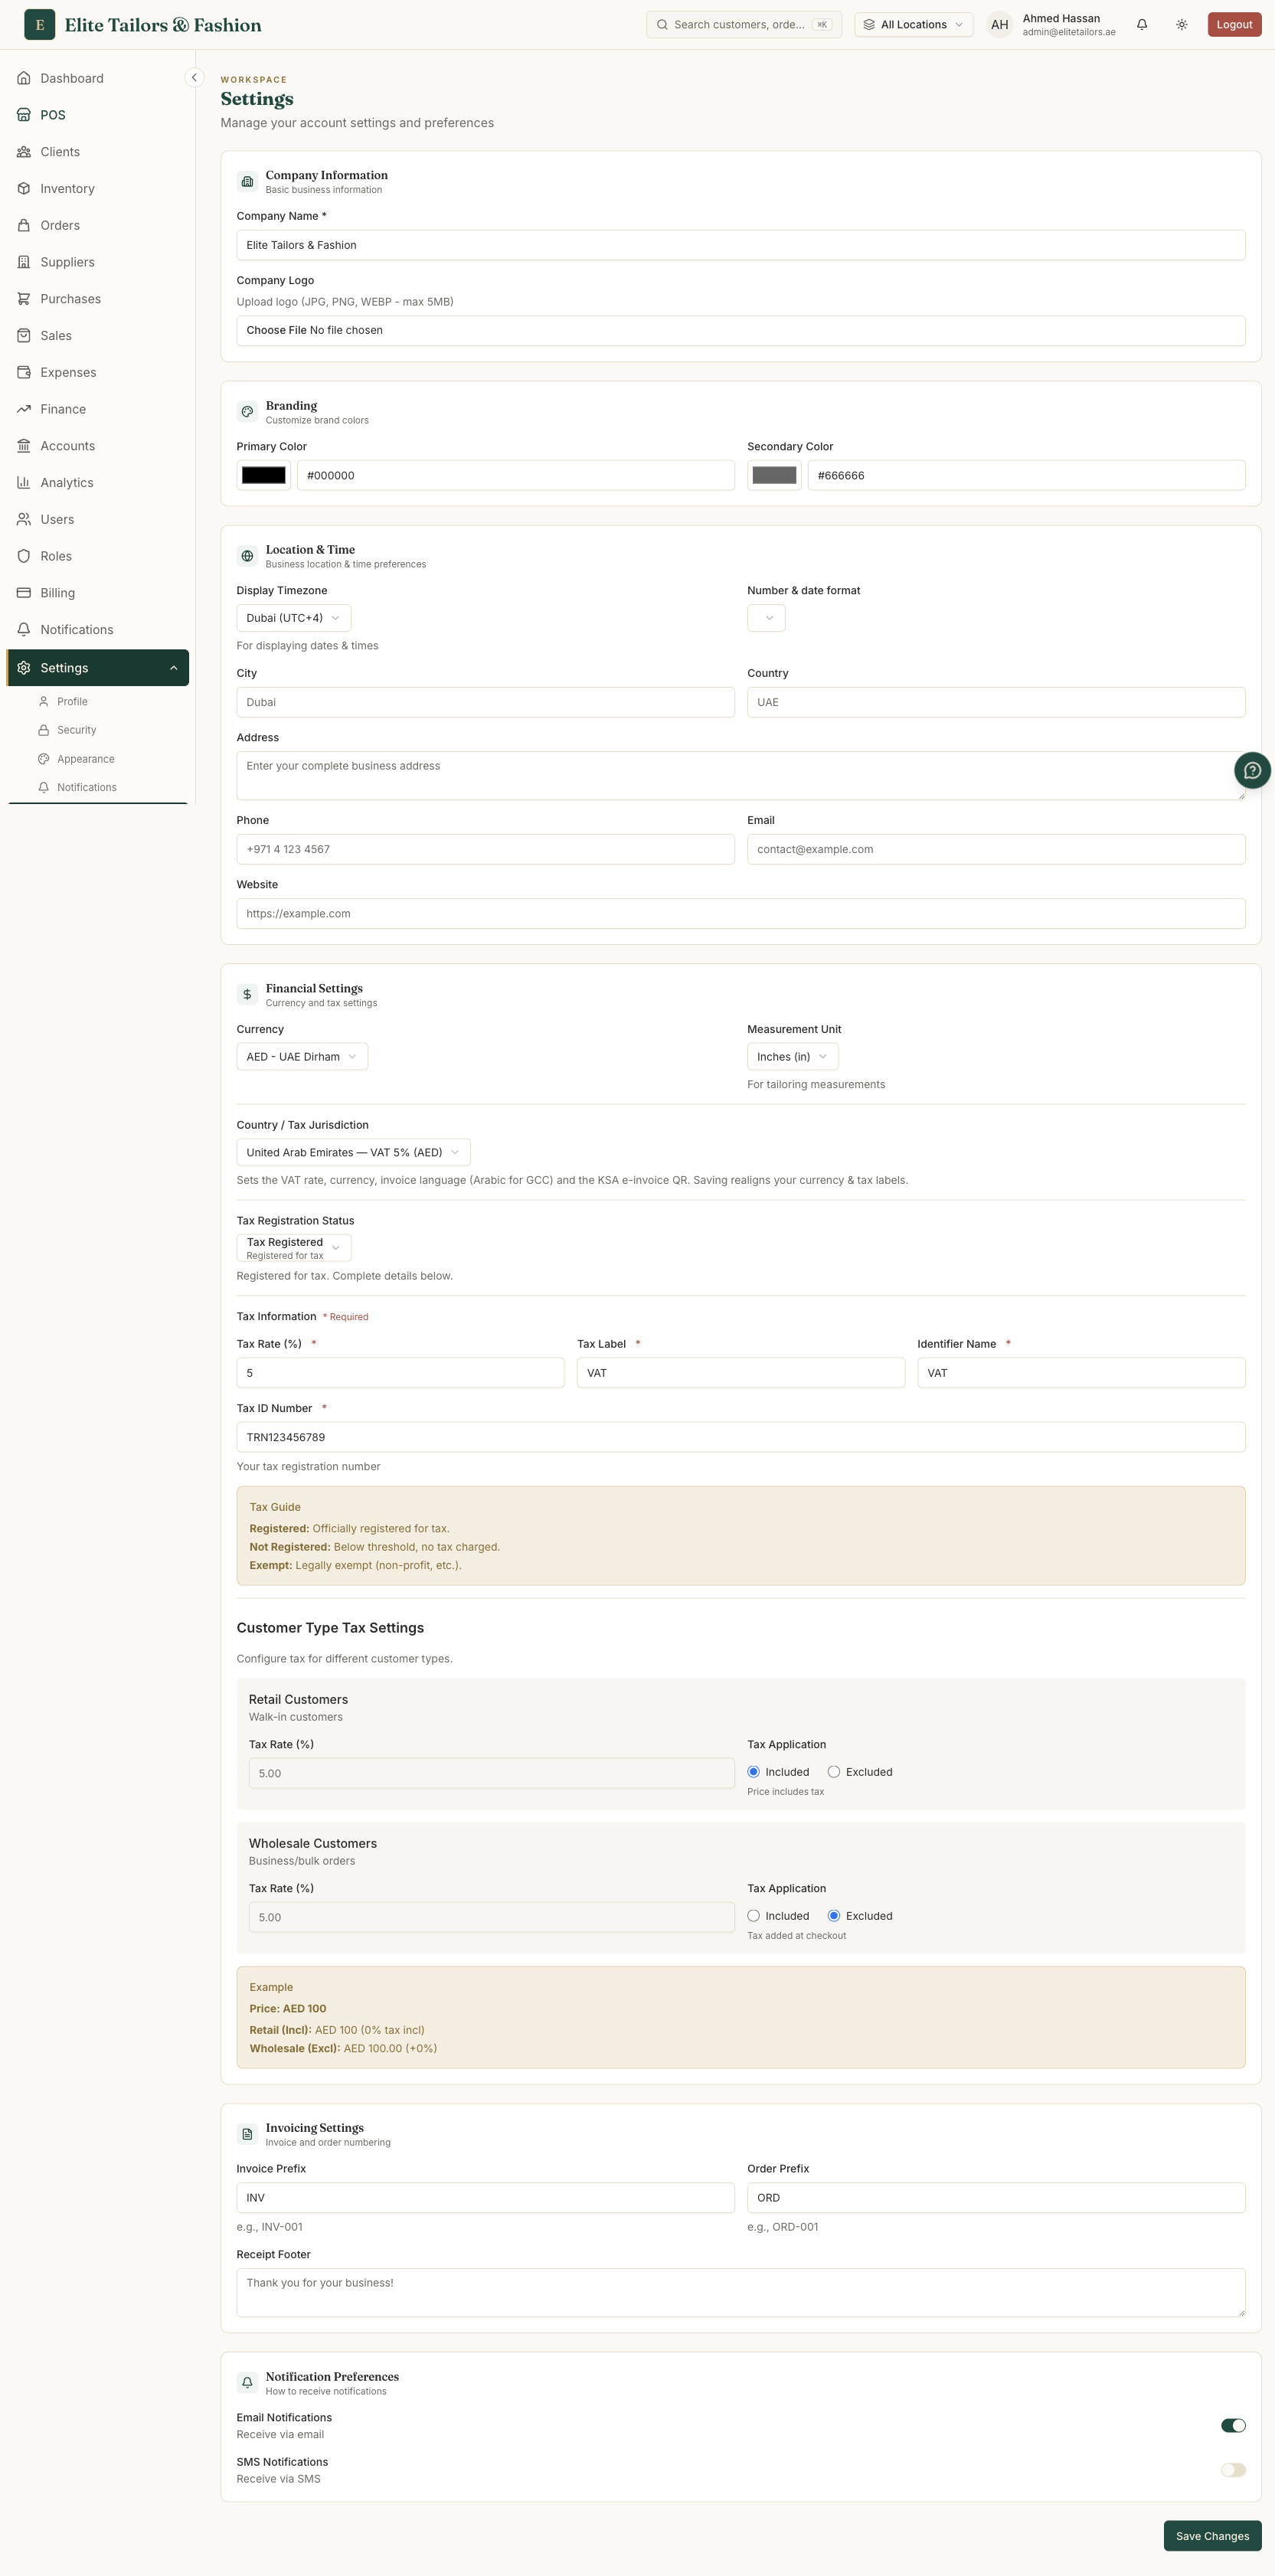
Business details and tax come first
Finish the Business section before you sell anything, because its numbers flow into every document you print. The top half is your identity: company name, logo (JPG, PNG or WEBP up to 5 MB), brand colours and contact details. Below it, Financial Settings holds the money rules. Your country sets the currency and VAT rate, and your Tax Registration Status decides whether tax is charged at all: Tax Registered if you hold a TRN, Not Registered if you are below the threshold, Tax Exempt if you are legally exempt. Registered shops can set different rates for retail walk-ins and wholesale accounts. One Save Changes button at the foot saves the whole section, with the logo the exception, since it has its own Upload button.
Set your country before you fine-tune anything else. Choosing a jurisdiction switches the currency straight away, and saving realigns the VAT rate and tax labels to that country's rules, so a rate you hand-picked first would be overwritten. Pick the country, save, then adjust the details.
Stock what you sell: products and services
Inventory holds what you sell, and each item is one of two types. A product is physical stock you count, like fabric by the metre or buttons by the piece; it tracks quantity and warns you when it runs low. A service is work with no stock behind it, like abaya stitching, jallabiya stitching or alterations; it carries a cost and a selling price so your margin is tracked, but no quantity. You need a category before you can add anything, so create Fabric or Accessory first, then add items. Each product also needs a SKU that is unique in your shop.
One customer, measured once
A customer lives in Clients, as either Retail (an individual) or Wholesale (a business account with a company name, TRN, credit limit and payment terms). The phone number is required and has to be unique, which is what keeps duplicates out; you pick the country from the flag menu and TailorSync stores the number in international form, like +971 50 123 4567. Open the customer's Measurements tab and save a named set, for example Standard or Wedding Kandura. Because the numbers belong to the customer, you measure once and reuse them on every order.
Write the first order
Now the payoff. In Orders, tap New order and pick the customer; their active measurement set comes up on its own, and TailorSync numbers the order for you so you never type one. Choose the type (custom, alteration or bulk), a priority and a delivery date, then add the garment either from your inventory or as a custom line. The VAT rate is fixed from your settings, so you cannot fat-finger it. Record the deposit the customer pays now and the method, and the summary works out the balance due. Tap Create and the order saves as Pending, reading Paid, Partial or Unpaid depending on the advance.
You do not need a full catalogue to begin. Your business and tax details, one fabric or one stitching service, and one customer are enough to write a real order on your first day. Everything else can be added as the work walks in.
Common questions
How do I set up a tailoring shop in TailorSync?
Work from the top down. In Settings, enter your business details and branding, then set your country and VAT registration (the UAE runs at 5% VAT with a TRN on tax invoices). Add any extra branches, load the fabrics and stitching services you sell, add a customer with their measurements, then write the order. The shop-wide settings only need doing once.
What VAT and TRN settings does a UAE tailoring shop need?
Open Settings, then Business, then Financial Settings. Pick United Arab Emirates so the currency is AED and the VAT rate is 5%. If your shop is VAT registered, set the status to Tax Registered and fill in your rate, the label VAT, the identifier TRN and your tax number, so they print on your tax invoices. TailorSync also covers Saudi Arabia (15%), Bahrain (10%), Oman (5%), and the no-VAT states Qatar and Kuwait.
Do I have to add all my products before taking the first order?
No. You only need enough to write a real order: your business and tax details, one fabric or one stitching service in Inventory, and one customer in Clients. Fabrics are products with tracked stock, while stitching and alterations are services with no stock, just a cost and a selling price. Add the rest of your catalogue as jobs come in.
Can TailorSync handle more than one shop location?
Yes, if your plan includes branches. Your original data sits at the Main Location, and you add other shops under Settings, then Branches, choosing what each one shares, such as inventory, clients and categories. The branch selector at the top of the app filters what you see by location.
Keep reading